
Delving into Git, Networking & Open Source
Second Week in DevOps: Git, Networking, and Open Source Contributions


Table of contents
- Introduction
- Wrapping Up Linux: Advanced Commands
- Deep Dive into Git and GitHub
- Getting Started with Open Source Contributions
- 1. What is Open Source?
- 2. Finding a Repository to Contribute
- 3. Finding the Right Issue
- 4. Understand and Validate the Issue
- 5. Fork and Start Contributing
- 6. Create Relevant Branches
- 7. Test Before Creating a Pull Request (PR)
- 8. Link PR to Issue
- 9. Wait for the Maintainer’s Review
- 10. Repeat
- Resources I Used:
- Learning Computer Networking Fundamentals
- Challenges I Faced & How I Overcame Them
- What’s Next?
- Let’s Connect!
Introduction
Hello there! 👋 Last week marked Week 2 of my DevOps journey. Due to my sports commitments, I had limited time, but I still managed to learn and explore several key topics. This week, I completed advanced Linux commands, Git + GitHub, Computer Network fundamentals, and a bit about Open Source contributions. Though progress was a bit slow, learning something new always counts!
Wrapping Up Linux: Advanced Commands
In my previous week, I covered basic Linux commands, but a few advanced commands were still left. I focused on find, grep, awk, and sed:
➡️ grep - Used to search for a particular pattern in a file.
➡️ find → Searches for files and directories based on name, size, type, etc.
➡️ awk → A scripting language mainly used for text processing, filtering, and formatting structured data.
➡️ sed → A stream editor that works on character streams for pattern matching and replacements.
Now that I have a solid grasp of Linux basics, I plan to deepen my understanding by practising more with real-world assignments and tasks.
Deep Dive into Git and GitHub
As a web developer, I had experience using Git and GitHub, but for DevOps, I needed to expand my knowledge. I revised Git basics and moved to advanced topics like branches, pull requests, and resolving merge conflicts. Learning best practices for branch creation and conflict resolution helped me understand how teams collaborate efficiently in a DevOps environment.
While learning GitHub, I stumbled upon Open Source Contributions and decided to explore how Open Source projects work and how to contribute.
Getting Started with Open Source Contributions
I watched several videos and read about how to contribute to Open Source projects. Here’s the step-by-step process I learned:
1. What is Open Source?
Open source refers to any program whose source code is publicly available for modification, contribution, and improvement.
2. Finding a Repository to Contribute
Use GitHub/GitLab search to find a project related to your preferred tech stack.
3. Finding the Right Issue
Start with "good first issues" in the issues tab of a repository. These are beginner-friendly and help you get started.
4. Understand and Validate the Issue
Before contributing, ensure you understand the issue and check the discussion to validate its relevance.
5. Fork and Start Contributing
Since you don’t have access to the original repository, fork (copy) the repo to your account and start working on your own copy.
6. Create Relevant Branches
Never work in the main or master branch. Follow branch naming conventions:
Bug fixes →
fix/<bug_name>New Features →
feat/<feature_name>
7. Test Before Creating a Pull Request (PR)
Before submitting a PR, ensure the changes work correctly and pass all required tests.
8. Link PR to Issue
Mention the issue number in your PR description:
fixes: #issue_numberresolves: #issue_number
9. Wait for the Maintainer’s Review
Be patient while the project maintainer reviews your PR. Engage in discussions if needed.
10. Repeat
Find another issue and continue contributing!
This was the step-by-step guide provided in the YouTube video.
I plan to find a suitable repository and make my first Open Source contribution in the coming days.
Resources I Used:
Git/GitHub → Kunal Kushwaha - Complete Git and GitHub Tutorial
Open Source Contributions → Piyush Garg (Open Source Bootcamp)
Learning Computer Networking Fundamentals
After exploring Open Source, I returned to my roadmap and focused on Computer Networking. I started with:
1. History of the Internet
Understanding why and how the internet was created helped me appreciate its evolution and role in modern computing.
2. Network Protocols
I explored different protocols, including HTTP, its methods, and status codes.
3. Network Architectures
I studied two primary architectures:
Client-Server Architecture
Peer-to-Peer Architecture
4. Network Topologies & Types
I learned about LAN, MAN, WAN and different network topologies used in enterprise environments.
5. OSI Model
One of the major topics I explored was the OSI (Open Systems Interconnection) Model, which consists of 7 layers:
Application Layer
Presentation Layer
Session Layer
Transport Layer
Network Layer
Data Link Layer
Physical Layer
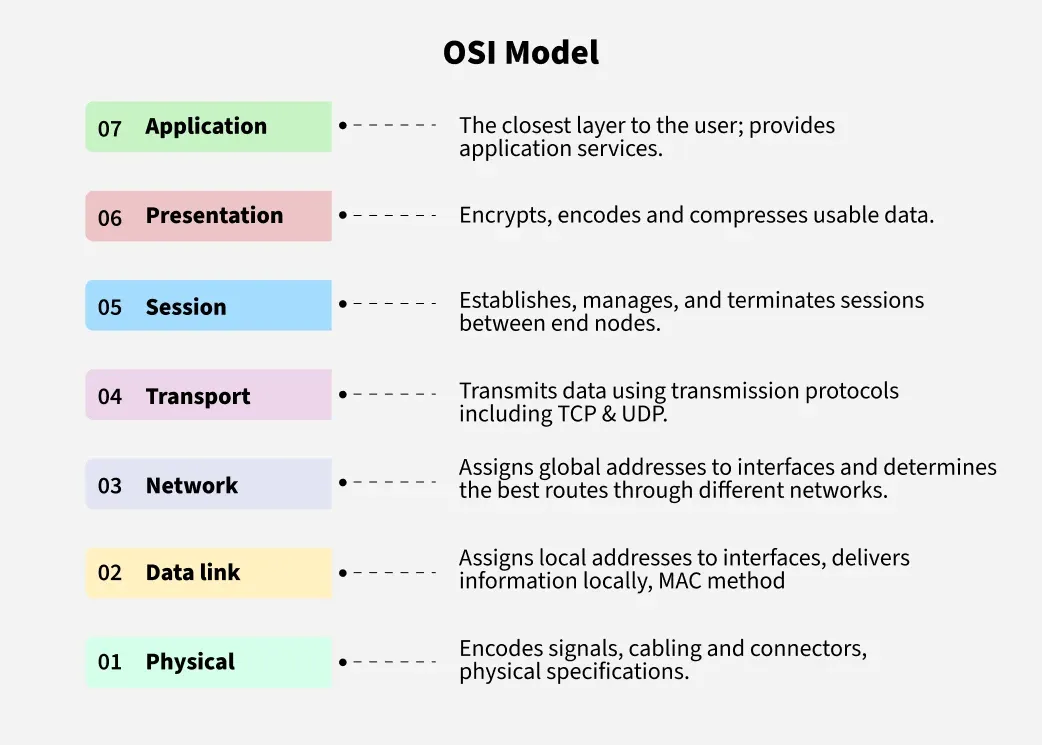
Each layer has specific responsibilities and protocols that ensure seamless data transfer over networks. I also studied how emails work and the different protocols used in email communication.
Resources I Used:
Computer Networking → Kunal Kushwaha - Computer Networking Full Course
GeeksforGeeks Networking Articles
Challenges I Faced & How I Overcame Them
Understanding Differences Between
grep,awk, andsed🔹 Problem: I was confused about when to use each command.
🔹 Solution: I searched for real-world examples and experimented with them.
🔹 Resources: Baeldung - grep, sed, awk differences, Linode - awk, grep, sed differences
Getting Started with Open Source Contributions
🔹 Problem: I can't determine a starting point for Open Source Contribution.
What’s Next?
For next week, my goals are:
✅ Understanding how DNS works
✅ Deep dive into each OSI model layer
✅ Getting started with Bash Scripting
Let’s Connect!
If you have any recommended resources, some better approaches to challenges I faced, insights, or tips, I’d love to hear from you! Drop them in the comments. Thank you for reading till the end!
Have a wonderful day.