
Networking Deep Dive & Bash Scripting Adventures
Week 3: Networking, Bash Scripting, and Projects


Table of contents
- Introduction
- Exploring the Depths of Networking
- Getting Started with Bash Scripting
- First Project: Deploying a Django App using Docker & Nginx
- Second Project: Creating an AWS EC2 Instance using Bash
- Step 1: Checking AWS CLI Installation
- Step 2: Installing AWS CLI
- Step 3: Creating the EC2 Instance
- Step 4: Waiting for Instance to Run
- Step 5: Automating AWS Configuration
- Step 6: Bringing It All Together
- Resources I Used for Bash Scripting:
- Challenges I Faced
- What’s Next?
- Let’s Connect!
Introduction
Hello there! 👋 This past week marked the third week of my DevOps journey, and it has been an exciting and challenging one. I dived deep into how DNS works, the TCP/IP model, Bash scripting, and built some projects along the way. I also faced my fair share of errors (as expected), but overcoming them was a great learning experience. Let's go through each topic in detail!
Exploring the Depths of Networking
Last week, I covered the basics of computer networks, including the OSI model and network topologies. This week, I explored:
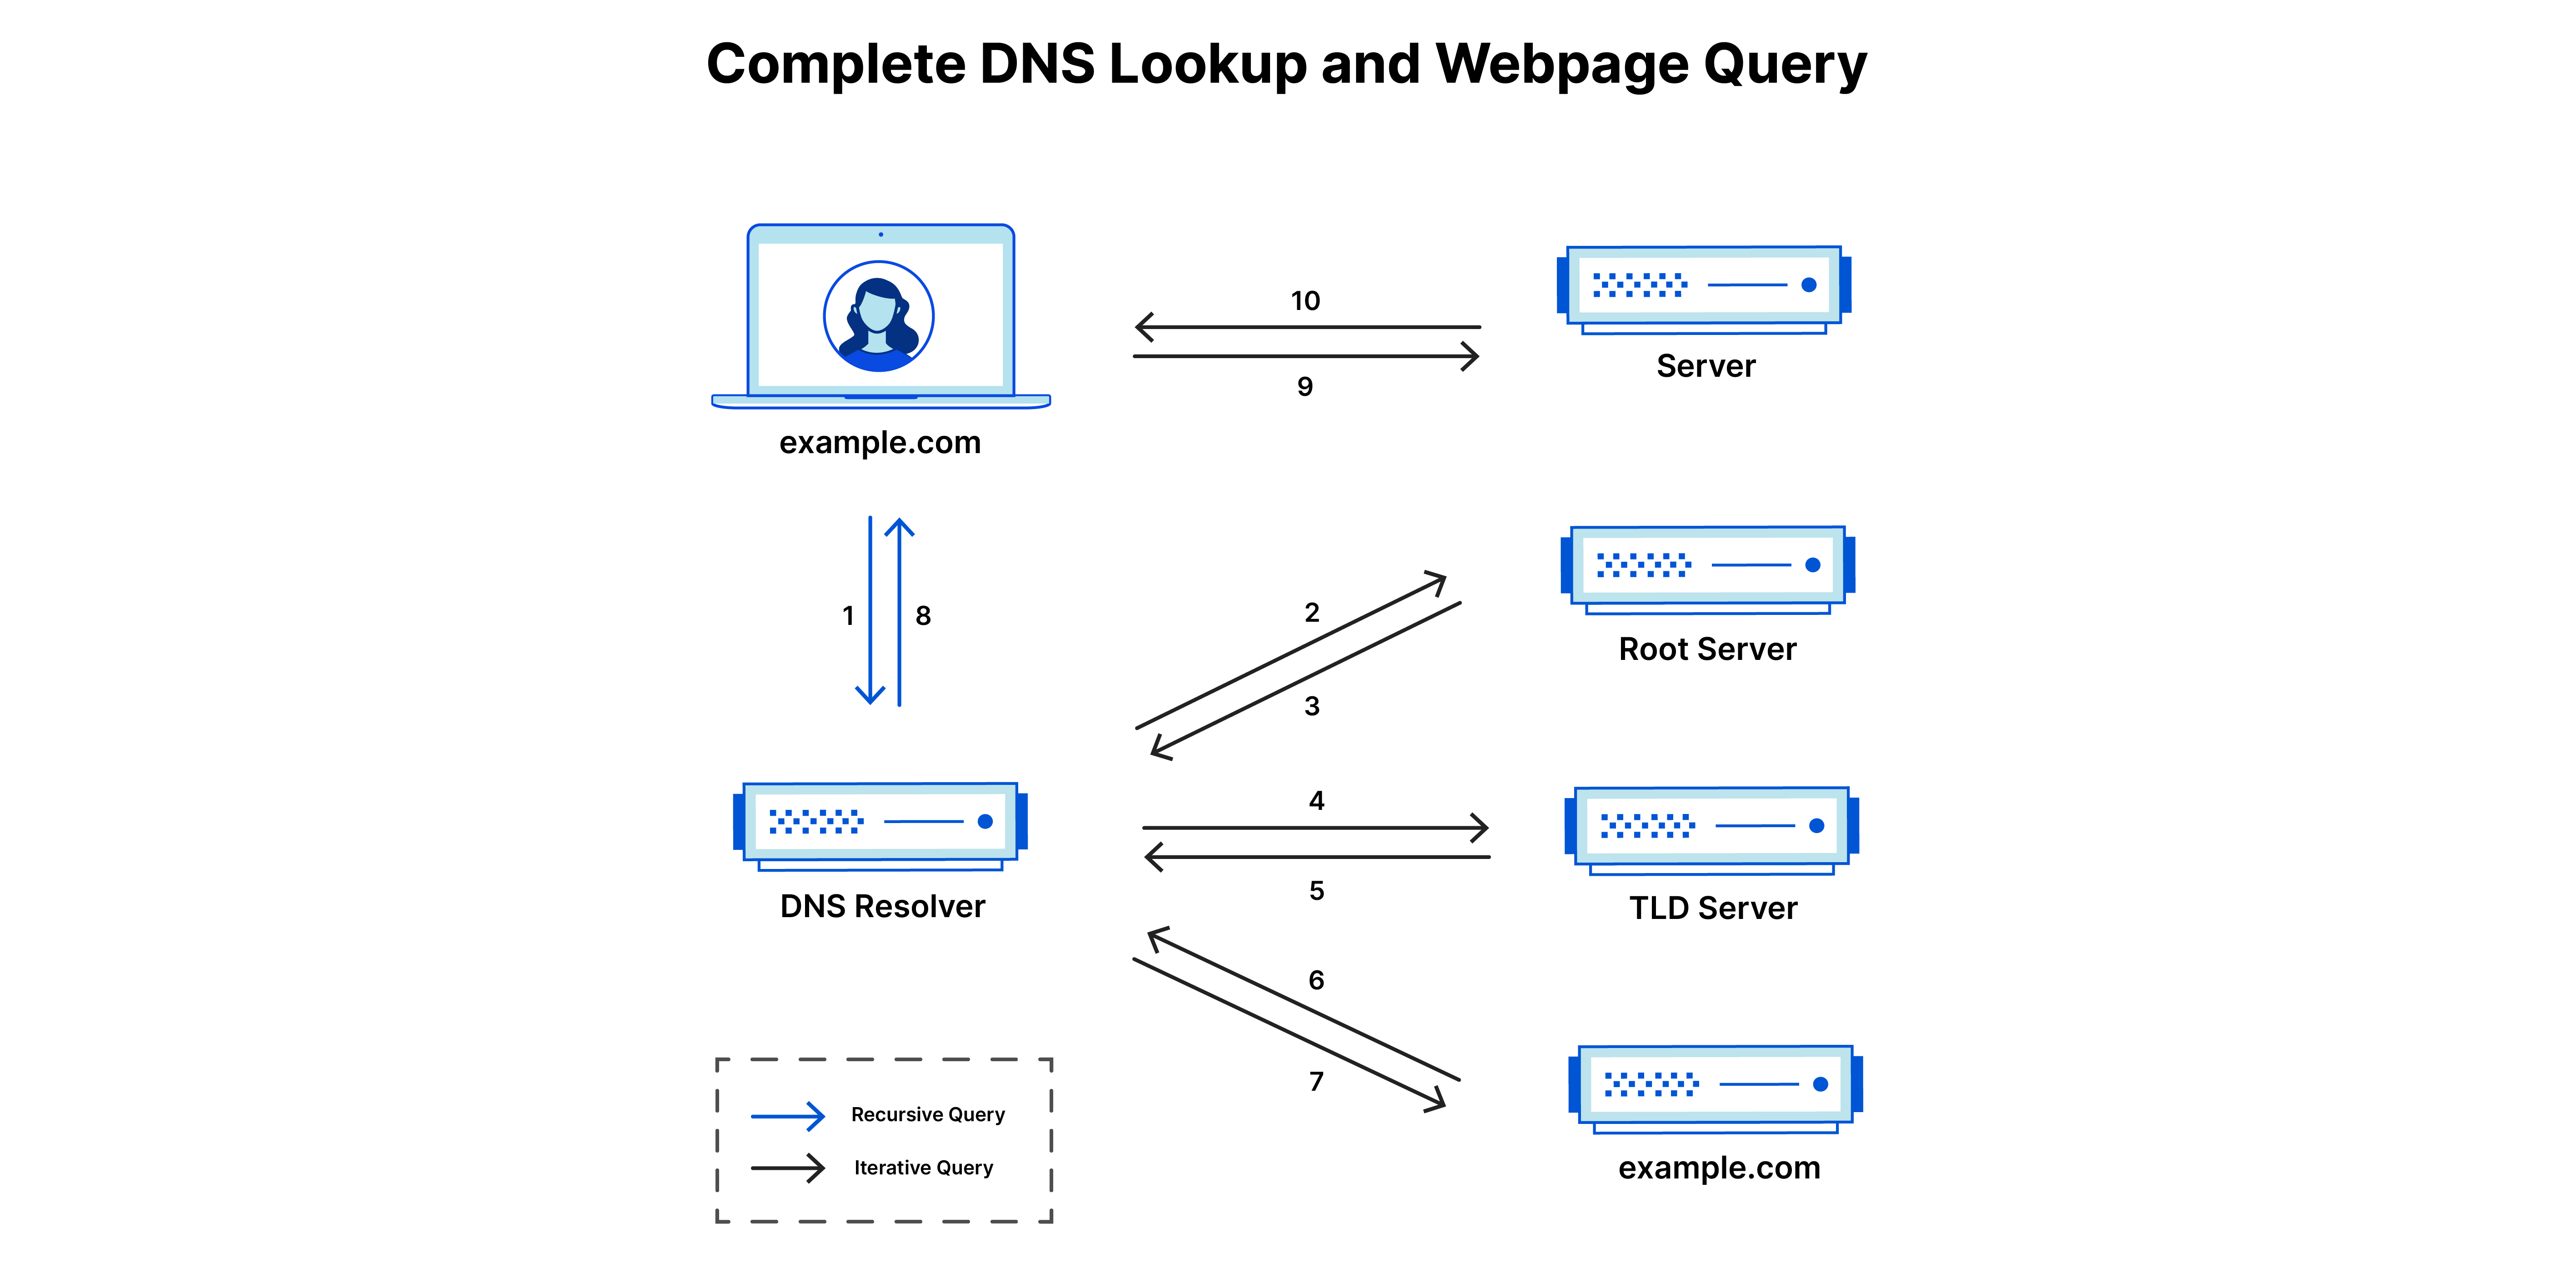
1. How DNS Works
The Domain Name System (DNS) is what helps map human-readable domain names (like google.com) to IP addresses that machines understand. Learning about DNS helped me understand:
The role of DNS resolvers, root servers, TLD servers, and authoritative name servers.
How requests flow when a user enters a URL in the browser.
2. TCP/IP Model
Unlike the theoretical OSI model, the TCP/IP model is the real-world networking framework we use every day. It consists of the following layers: 1️⃣ Network Access Layer (Link Layer) – Deals with physical transmission of data.
2️⃣ Internet Layer – Responsible for addressing and routing packets using protocols like IP.
3️⃣ Transport Layer – Manages end-to-end communication using protocols like TCP and UDP.
4️⃣ Application Layer – Interfaces with user applications like HTTP, SMTP, and FTP.
Some resources describe the TCP/IP model as 5 layers, merging the Data Link Layer and Physical Layer into one. Learning about this model made it easier for me to grasp how data packets travel across networks and how routing works.

3. Forward and Reverse Proxy
I also explored proxy servers and how they act as intermediaries between clients and the internet:
Forward Proxy: Sits between the client and the web, helping in hiding identity, caching content, and filtering traffic.
Reverse Proxy: Sits between the web server and users, mainly used for load balancing, security, and caching.
A widely used example of a Reverse Proxy is Nginx, which I plan to explore in-depth soon.
Resources I Used for Networking:
Getting Started with Bash Scripting
After wrapping up Networking, I jumped into Bash scripting. The first thing I did was understand what Bash is and how it differs from other shells. Then, I got hands-on by writing my first script:
#!/bin/bash
# My first Bash script

echo "This is my first script as a DevOps Student"
echo "Lionel Andres Messi"
echo "GOAT"
A bit embarrassing, but let's move past that. 😅
I then learned about:
Variables & Comments
If statements & Loops
Exit Codes & Functions
Command-line arguments & Case statements
To practice Bash scripting, I built some small projects like:
✅ A simple to-do list script that adds tasks to a file.
✅ A basic calculator script for performing arithmetic operations.
First Project: Deploying a Django App using Docker & Nginx
Even though I had no prior experience with Docker and Nginx, I followed along with a tutorial where the instructor explained each script, ran it, and debugged errors. But while following the tutorial, I encountered an unexpected error:
error checking context: no permission to read from '/home/vagrant/DevOps-Learning/shell-scripting/script-projects/django-notes-app/data/mysql/db/#ib_16384_0.dblwr'
Failed to build and deploy the app.
Solution:
The error occurred because Docker didn’t have permission to access the MySQL folder in the cloned repo.
I used the
chowncommand to give the current user ownership of the folder.Then, I modified the permissions of the cloned repo.
This allowed me to successfully deploy the app using Docker Compose & Nginx. However, since I was running my Ubuntu machine in a VM, I couldn't access localhost:8000 directly. Instead, I checked my VM’s IP using ip addr show and accessed the port via that IP.
Second Project: Creating an AWS EC2 Instance using Bash
This project aimed to automate the process of creating an AWS EC2 instance using Bash scripting. I was particularly excited about this project as it gave me a real-world perspective on automation and infrastructure provisioning.
Step 1: Checking AWS CLI Installation
Before proceeding with creating an instance, I needed to ensure that AWS CLI was installed. To check this, I wrote the following function:
check_awscli() {
    if ! command -v aws &> /dev/null; then
        echo "AWS CLI is not installed. Installing it now..." >&2
        return 1
    fi
}
If AWS CLI wasn’t installed, I wanted the script to handle the installation automatically.
Step 2: Installing AWS CLI
To automate the installation of AWS CLI on a Linux system, I wrote this function:
install_awscli() {
    echo "Installing AWS CLI v2 on Linux..."

    # Download and install AWS CLI v2
    curl "https://awscli.amazonaws.com/awscli-exe-linux-x86_64.zip" -o "awscliv2.zip"
    sudo apt-get install -y unzip &> /dev/null
    unzip awscliv2.zip
    sudo ./aws/install

    # Verify installation
    aws --version || {
        echo "AWS CLI installation failed. Please install manually."
        exit 1
    }

    # Clean up
    rm -rf awscliv2.zip ./aws

    echo "AWS CLI Installation Completed."
}
This function downloads and installs AWS CLI, verifies the installation, and cleans up unnecessary files.
Step 3: Creating the EC2 Instance
Once AWS CLI was installed, I wrote a function to create an EC2 instance using AWS CLI commands:
create_ec2_instance() {
    local ami_id="$1"
    local instance_type="$2"
    local key_name="$3"
    local subnet_id="$4"
    local security_group_ids="$5"
    local instance_name="$6"

    # Run AWS CLI command to create EC2 instance
    instance_id=$(aws ec2 run-instances \
        --image-id "$ami_id" \
        --instance-type "$instance_type" \
        --key-name "$key_name" \
        --subnet-id "$subnet_id" \
        --security-group-ids "$security_group_ids" \
        --tag-specifications "ResourceType=instance,Tags=[{Key=Name,Value=$instance_name}]" \
        --query 'Instances[0].InstanceId' \
        --output text
    )

    if [[ -z "$instance_id" ]]; then
        echo "Failed to create EC2 instance." >&2
        exit 1
    fi

    echo "Instance $instance_id created successfully."

    # Wait for the instance to be in running state
    wait_for_instance "$instance_id"
}
This function takes multiple parameters such as AMI ID, instance type, key name, subnet ID, security group ID, and instance name. After executing the AWS CLI command to create an instance, it waits for the instance to be fully initialized.
Step 4: Waiting for Instance to Run
Once the EC2 instance is created, the script waits until the instance reaches the running state:
wait_for_instance() {
    local instance_id="$1"
    echo "Waiting for instance $instance_id to be in running state..."

    while true; do
        state=$(aws ec2 describe-instances --instance-ids "$instance_id" --query 'Reservations[0].Instances[0].State.Name' --output text)
        if [[ "$state" == "running" ]]; then
            echo "Instance $instance_id is now running."
            break
        fi
        sleep 10
    done
}
Step 5: Automating AWS Configuration
A key realization was that AWS CLI requires manual configuration before usage, which defeats the purpose of full automation. I discovered that AWS credentials are stored in .aws/config and .aws/credentials, so I automated this process:
configure_aws() {
    local aws_access_key="$AWS_ACCESS_KEY_ID"
    local aws_secret_key="$AWS_SECRET_ACCESS_KEY"
    local aws_region="$AWS_DEFAULT_REGION"

    # Ensuring the .aws directory exists
    mkdir -p ~/.aws

    cat > ~/.aws/credentials <<EOL
[default]
aws_access_key_id = $aws_access_key
aws_secret_access_key = $aws_secret_key
EOL

    cat > ~/.aws/config <<EOL
[default]
region = $aws_region
output = json
EOL

    echo "AWS CLI configured successfully."
}
This function pulls AWS credentials and region information from environment variables and writes them into the required configuration files. This ensures that AWS CLI is ready to use without manual intervention.
Step 6: Bringing It All Together
Finally, I wrapped everything into a main function and executed the script:
main() {
    check_awscli || install_awscli

    configure_aws || {
        echo "AWS Configuration failed, exiting..."
        exit 1
    }

    echo "Creating EC2 instance..."

    # Specify the parameters for creating the EC2 instance
    AMI_ID="ami-04b4f1a9cf54c11d0"
    INSTANCE_TYPE="t2.micro"
    KEY_NAME="$AWS_KEY_NAME"
    SUBNET_ID="$AWS_SUBNET_ID"
    SECURITY_GROUP_IDS="$AWS_SECURITY_GROUP_IDS"
    INSTANCE_NAME="Shell-Script-EC2-Demo"

    # Call the function to create the EC2 instance
    create_ec2_instance "$AMI_ID" "$INSTANCE_TYPE" "$KEY_NAME" "$SUBNET_ID" "$SECURITY_GROUP_IDS" "$INSTANCE_NAME"

    echo "EC2 instance creation completed."
}

main "$@"
After writing and testing this script, I was thrilled to see everything working smoothly on the first run! This was a huge confidence booster as I managed to:
Automate the installation of AWS CLI
Configure AWS CLI without manual input
Create an EC2 instance automatically
Ensure the instance reaches a running state

This project helped me understand how real-world automation works in DevOps.
Resources I Used for Bash Scripting:
Challenges I Faced
1️⃣ Understanding Data Flow in Networking
Problem: Couldn't grasp how data flows across layers in networking models.
Solution: Asked my roommate (who studied CN), and he explained it with real-world examples.
2️⃣ Errors in Django Deployment
- Solution: Used Stack Overflow & ChatGPT to debug errors, modifying file permissions & user ownership.
3️⃣ Automating AWS CLI Configuration
- Solution: Discovered where AWS stores credentials and wrote a script to automate the process.
What’s Next?
Next week, I plan to:
✅ Explore more Bash scripting projects
✅ Learn Makefile for automation
✅ Revise Python basics & explore advanced Python for DevOps
Let’s Connect!
LinkedIn: My LinkedIn Profile GitHub: My GitHub Profile
If you have any recommended resources, better approaches to my challenges, or insights, I’d love to hear them! Drop your thoughts in the comments.
Have a wonderful day!